


DIY Chevron Wall Art
As a student, I have very limited funds for unnecessary things such as redecorating my apartment when in all likelihood I'll be leaving it in less than a year. However, as a student who lives very far away from home, I believe it is extremely important to live in a space that feels homey. I have had lots of time this summer to devote to my redecoration and I've been doing tons of fun DIY projects that I can't wait to share with you. To kick things off, I'm going to share the process for creating your own chevron wall art.
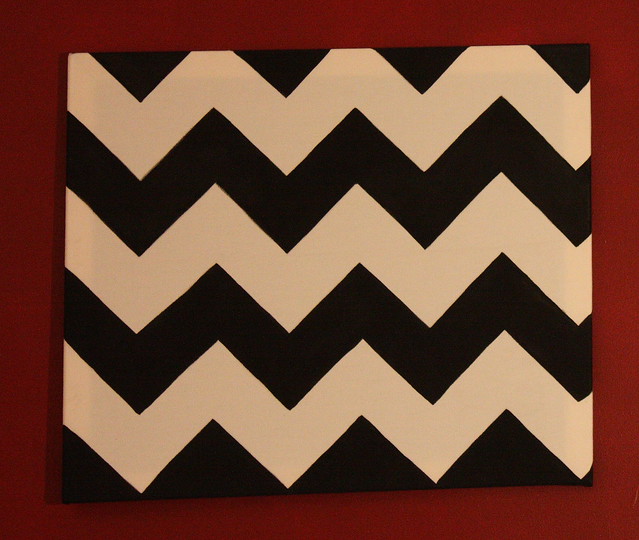
I'm definitely on board with the chevron trend (LOVEEE IT) but I'm not lovin' the prices for all things chevron. Luckily, it's really easy to make your own chevron print. The cool thing about this project is it can be easily translated to other projects. You can use this to paint picnic blankets, walls, fabric, or really anything that needs a good bit of chevron striping!
What you'll need:
-Canvas
-Colored Pencil (or something to mark with that can be easily covered)
-Paint (I used acrylic)
-Paint brush
-a Triangle
How to do it:
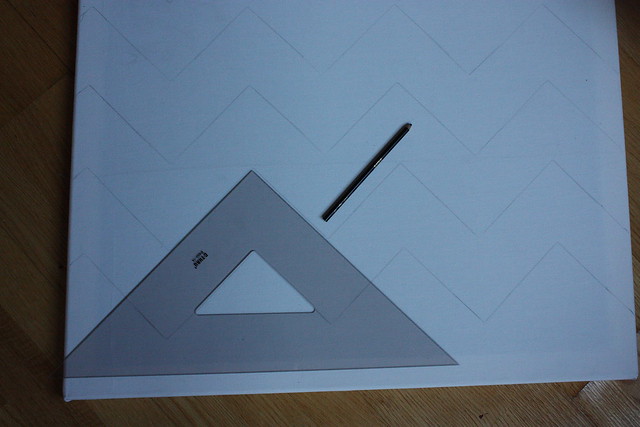
1) Start by laying the corner with the obtuse angle of your triangle onto the canvas and trace it. You can decide how long or short you want your stripes to be by how much of the angle you trace on the first row.
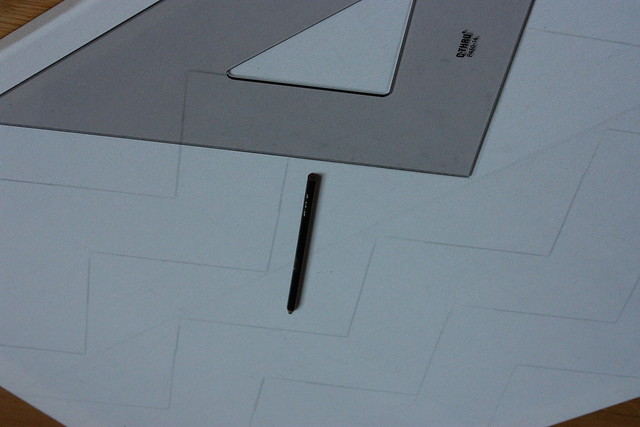
2) Flip your triangle upside down so it settles into the valley of two of the other triangles you just traced. The inside of my triangle was cut out so I used that area to begin the lines of my next row.
3) Once you finish tracing those lines, you'll want to flip your triangle over again and connect all the lines.
3) Continue tracing your angles row by row using this technique.
4) Once all your lines are traced, paint every other row in whatever color your heart desires!
Mine took me about an hour and a half. It makes such a great impact on my wall and was so easy. The total cost for mine was about $7.00 because I already had the paint and triangle.
If any of you make your own version, I'd love to see!!
xoxo
Mal
P.S.
I realize my directions are a little confusing so if you have any questions, don't hesitate to ask!
7 notes:
whoa! this is so impressive! i would be so bad at keeping the lines straight - even with a ruler! i love how it turned out, malori. :)
Thank you!! I love it so much :). I think you could DEFINITELY get some straight lines. I believe you :)
You did an amazing job! :). I love it!
Thanks Ashley!!
gorgeous. i think i may do this. how did you put the canvas on whatever its on?
love, little.
Great question! I had a bunch of white fabric laying around so I just bought the wood to make my own canvas stretcher (you can find these pieces at pretty much any art store). It might be easier to just buy pre-stretched canvas but I'd guess it's a lot cheaper to do it my way.
The link below is what I used for mine.
(http://www.dickblick.com/categories/stretcherstrips/?wmcp=google&wmckw=canvas%20stretcher%20frames&wmcid=adwords&gclid=CP2g-snisaoCFcO77Qod7RKO-A)
As far as actually stretching your fabric over the frame, you can either use a staple gun or hot glue.
Good luck!
i'm so stoked you shared this. i will definitely be trying it asap!
love, little.
Post a Comment